We know that Xiaomi's routers can implement external network access to internal devices. So, what other related functions can be achieved? The answer is yes. Xiao Bian will share how to combine the various functions of Xiaomi's routing with the idle computer at home to build a personal website. I hope that the corresponding website development enthusiasts or some student friends can help in daily technical learning tests. .
In fact, millet routing can be set up directly on the site, but is limited to the router's CPU and memory, are interested in everyone can play, but the actual use will lead to almost embarrassing, but also affect the intranet normal Internet access, so only for the hobby Test use.

Millet Router
Millet router build personal website tutorial
1, set DDNS
If your broadband provides you with a non-public network ipv4 address, you can make a request to the operator on your own.
First, use a browser to open http://miwifi.com on the computer and log in to the management interface of the millet router and log in with your password. After entering Advanced Settings - DDNS Add Service - Select Service Provider - Enter User Name, Password, Domain Name - Set Forced Refresh Time (optional).
2, millet router set static IP binding
Go to Advanced Settings - DHCP Static IP Assignment, click 'Add', and select your idle computer. If the computer is not connected, you can manually bind using the mac address.
3, install the system on idle computer
The specific system installation method will not be described here. Windows/Linux is available. It is recommended to install each distribution of Linux (Deepin was recently played, so this article will use Deepin as an example).
4, configure the site to run on idle computer dependencies
This article is to take care of novice, will use a simple platform to build operational dependencies, such as BT, WDCP, etc. This article will use the Pagoda BT panel as a demonstration.
High-end users can build their own environment, such as php, MySQL, etc.
To take care of Linux running non-GUI interface, this article will use remote terminals. Students with GUI interface can directly operate on Linux (skip to step 4.2 directly).
4.0.1 If Windows, download and install Pagoda Panel Windows directly
4.1 Connecting to Linux
Windows Please download and use Putty/ SecureCRT/ XShell, etc.
macOS / Linux Please use your own terminal
iOS users download and use Termius etc. (no JailBreak required)
Android users download each terminal software
In the terminal, enter the following command to access the Linux computer. xx.xx.xx.xx is the Linux ip. The username must be a local user with root privileges.
Ssh .xx
In this article, the target Linux IP is 10.10.0.65 and the user is zz. The command is:
Ssh .0.65
Successful login after verifying password
[Figures for the configuration of the external network after I set the port forwarding, (forwarding the external port 5522 to the internal 10.10.0.65:22), the command is ssh -p 5522 ain]

4.2 Installing BT Panel
According to different distributions of Linux, run the following command in the terminal to install.
Please check whether wget is installed (included in Centos installation command). If not, install it first. The command is:
Sudo apt-get update
Sudo apt-get install wget
Centos installation command:
Yum install -y wget && wget -O install.sh http://download.bt.cn/install/install.sh && sh install.sh
Ubuntu/Deepin installation command:
Wget -O install.sh http://download.bt.cn/install/install-ubuntu.sh && sudo bash install.sh
Debian install command:
Wget -O install.sh http://download.bt.cn/install/install-ubuntu.sh && bash install.sh
Fedora installation command:
Wget -O install.sh http://download.bt.cn/install/install.sh && bash install.sh
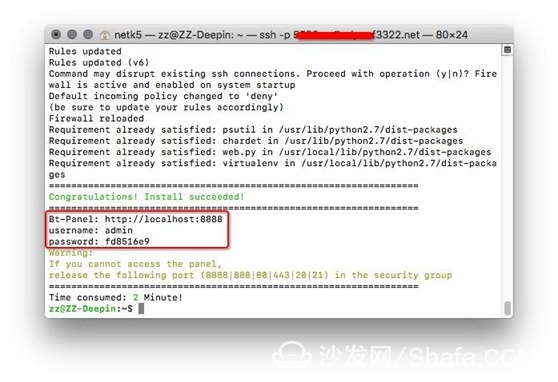
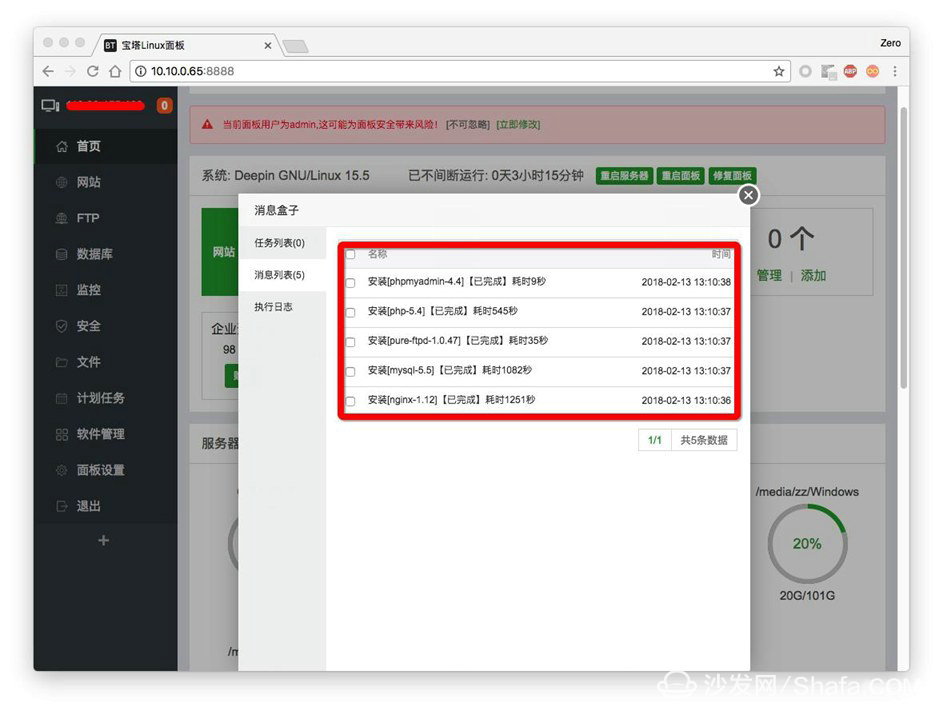
When you see this interface, it means that the BT panel has been installed successfully. The red box is the initial management account information (not generated by everyone, please do not copy the password)
5, configure the site operating environment
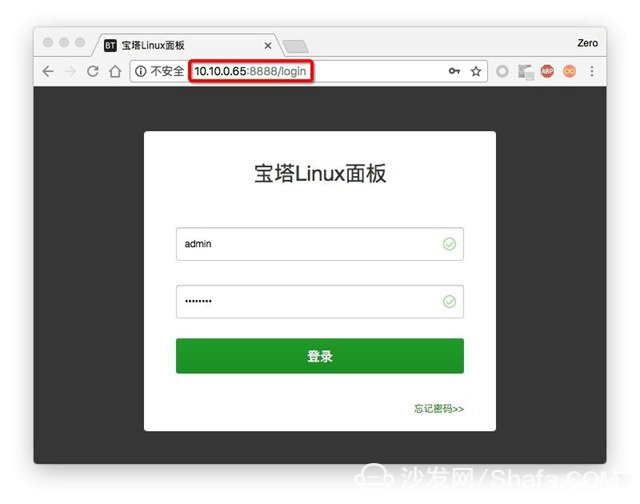
5.1 Log in to the BT background
Open http://ip.ip.ip.ip:8888 in the browser and enter the username and password and log in (see Step 4.2 at the end)
5.2 Installation Environment Dependence
After logging in, you can see the following interface, you can choose according to the website application and computer configuration you need to install.
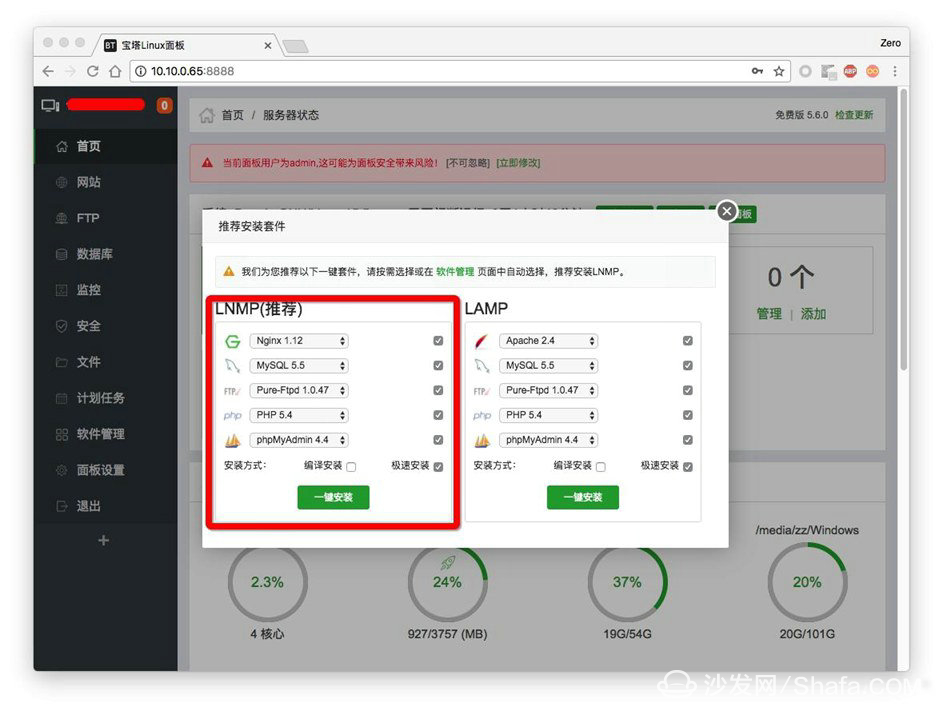
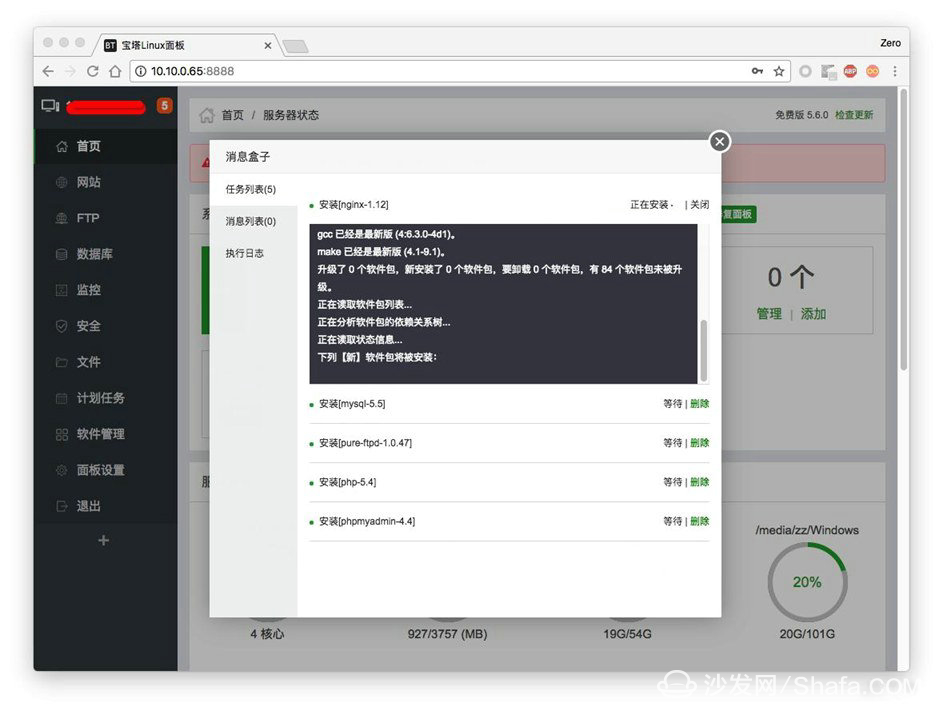
Wait patiently for the installation to end
Seeing the following interface shows that the site's dependency environment has been set up.
6, configure the website in BT background
6.1 Creating a Website
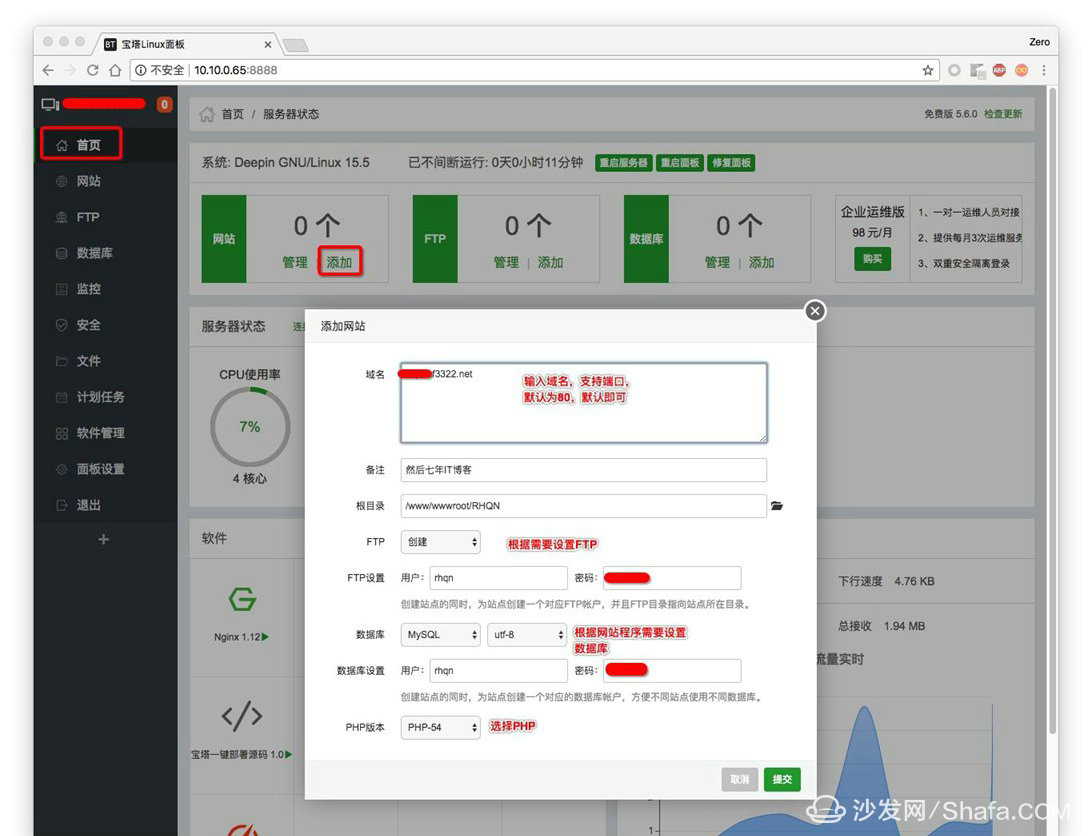
In BT Backstage - Home - Site - Add
In the open window set the domain name, FTP, database, PHP information. The database name will be the same as the database user name.
And make sure to remember your username and password.
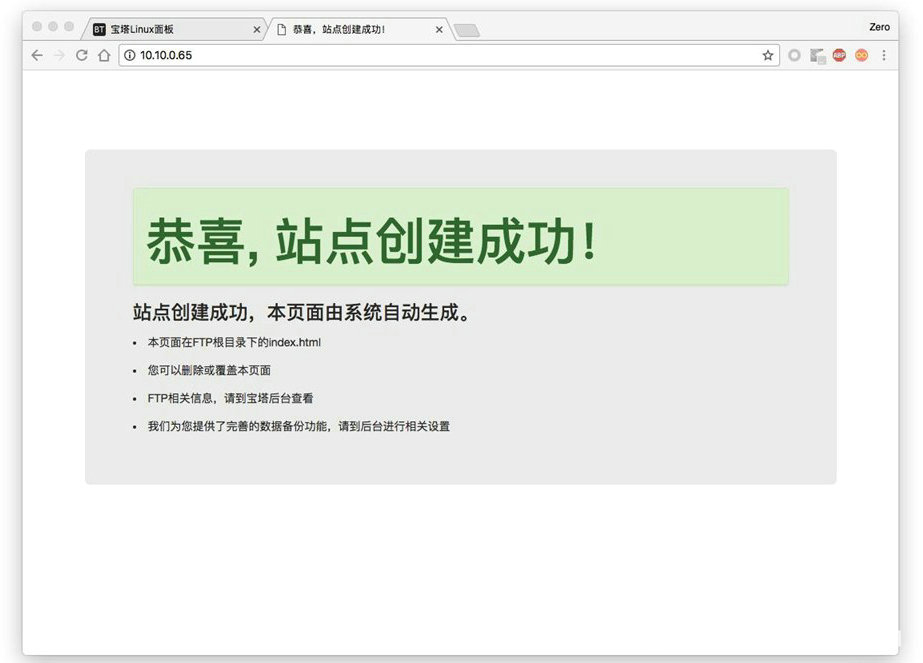
After submitting, we can try to visit the intranet ip to see if it can be seen that the site has been up, as shown on the site is ready, you can install the website program:
7, in the millet router set port forwarding
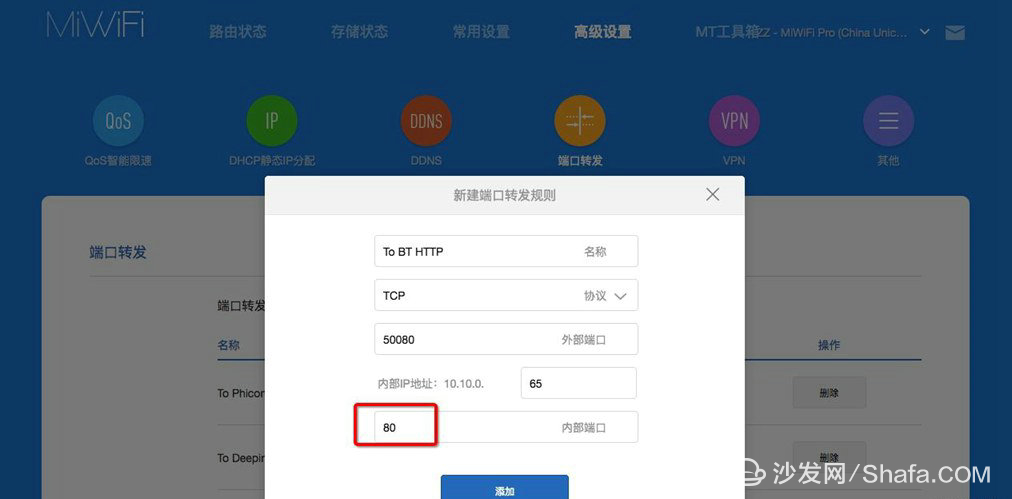
Use a browser to open http://miwifi.com and log in with your password, go to Advanced Settings - Port Forwarding - Port Forwarding Rules List.
Click the 'add rules' button, select the protocol as TCP, the external port can be defined, such as 50080. (Please avoid sensitive ports such as 80, 443, and 8080.) Internal IP Address Enter the IP address of the Linux computer.
Internal port:
FTP default: 21
Website HTTP Default: 80
If you have specified a website or FTP port, please enter your changed port.
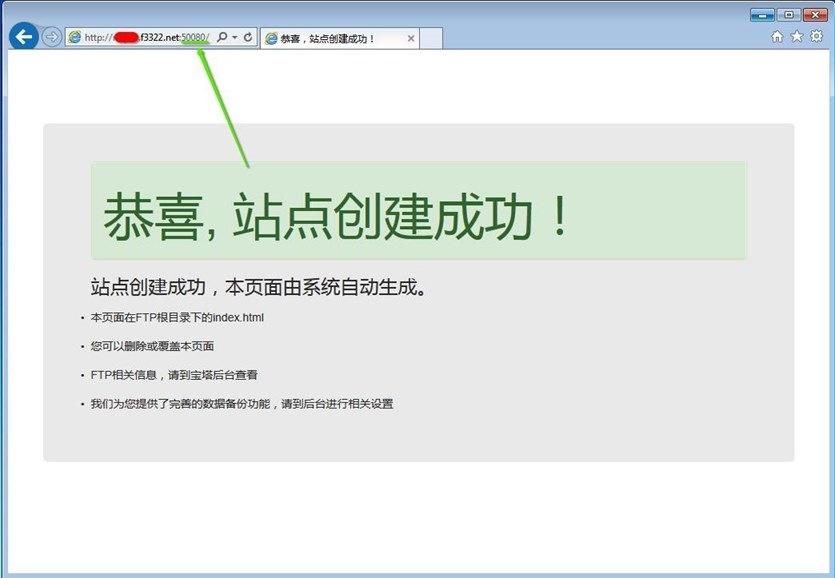
After it takes effect, we can try to open the domain name: port in the external network environment. The discovery can also access the website, indicating that the HTTP port forwarding has taken effect.
8, configure the website program in BT background
Nowadays, there are many and many website programs available for free trial. Which one is more suitable for you and you can try it yourself. This article will use the lightweight blog program typ as an example.
8.1 Download Website Packages
Download the package from the website official website.
8.2 Upload to BT
Since BT's FTP service needs to be debugged at present, for the convenience of novice operation, the BT web page background management is demonstrated here.
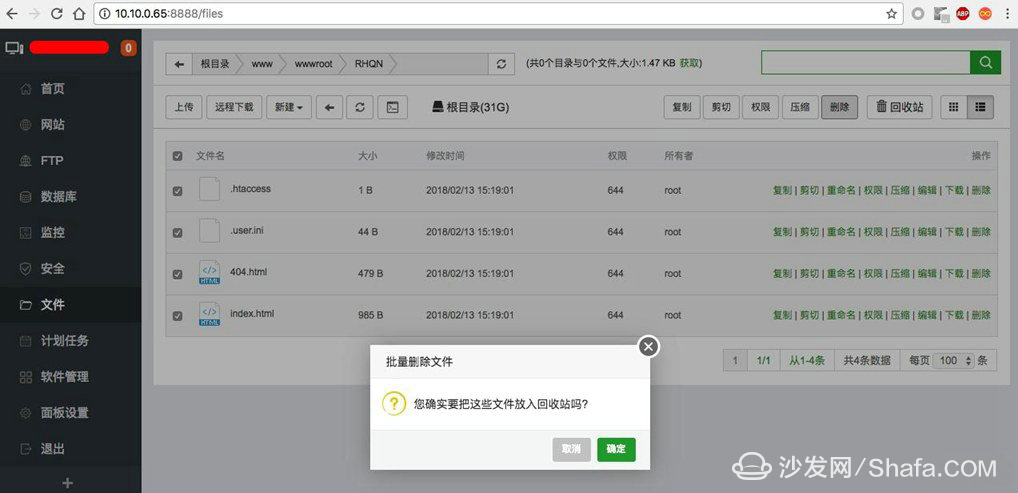
8.2.1 Deleting Default Files
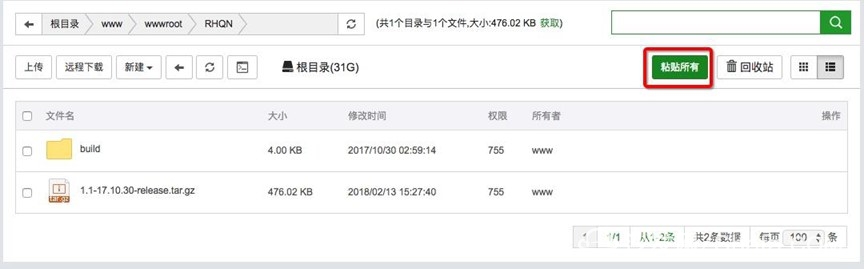
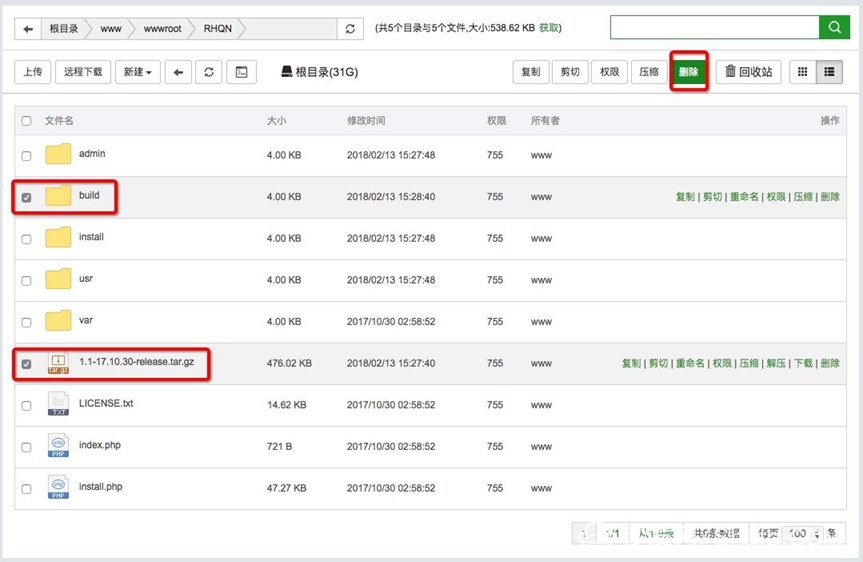
Enter BT background - File - Go to the site path you just created, such as /RHQN, delete the default file under it
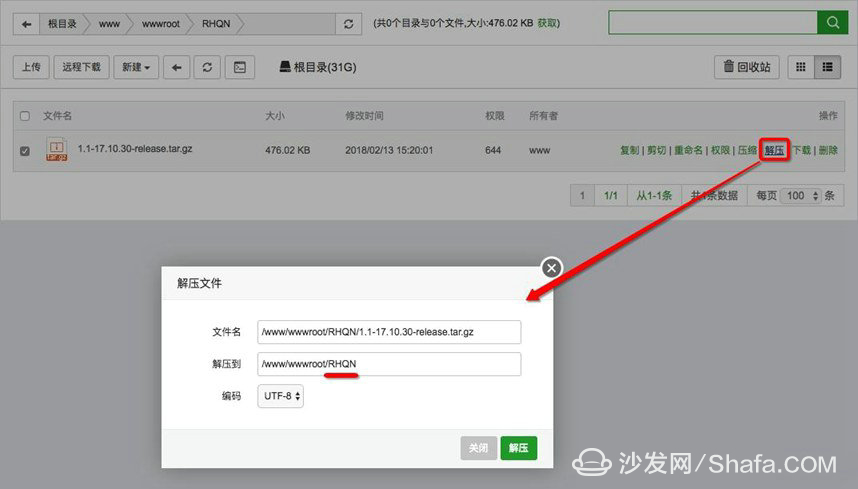
8.2.2 Upload Website Packages

8.2.2 Extracting Website Packages
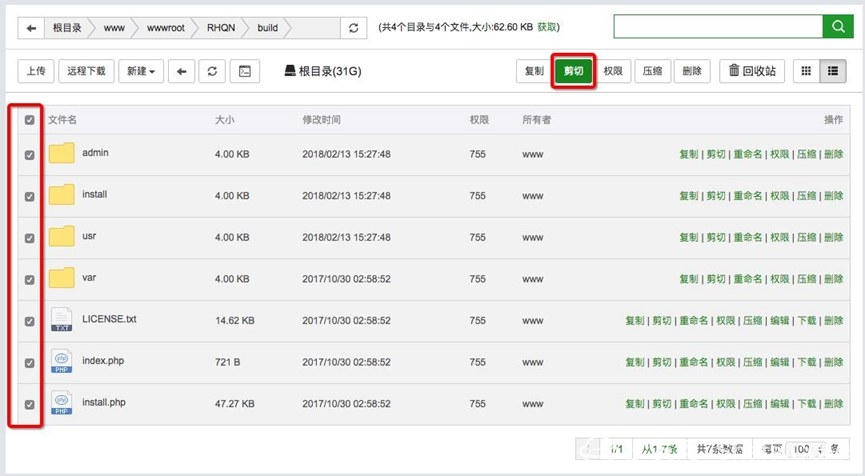
8.2.2 Cut to Website Root Directory
Make sure the website program is under /RHQN/
9, configure the site
Finally to the last step, is not very tired! ? It will be successful!
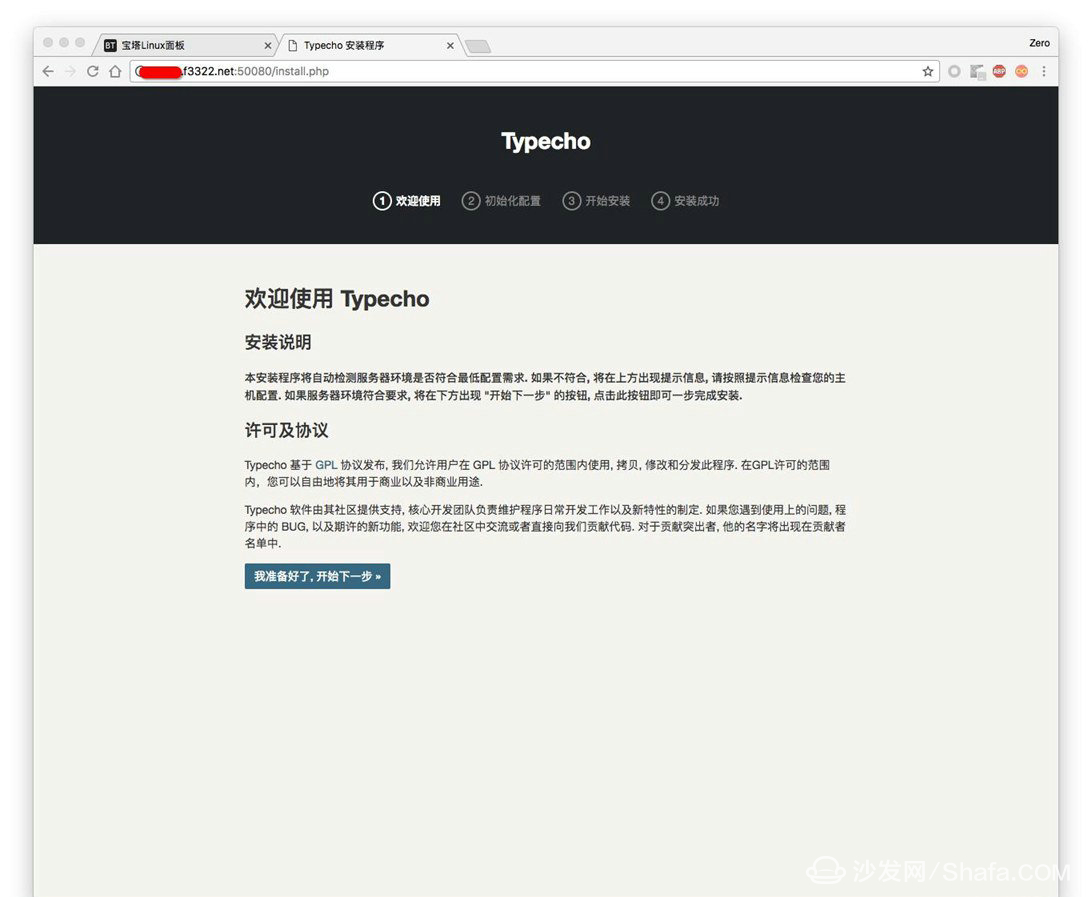
9.1 Installing Website Programs
Visit http://domain:port/install.php on the external network
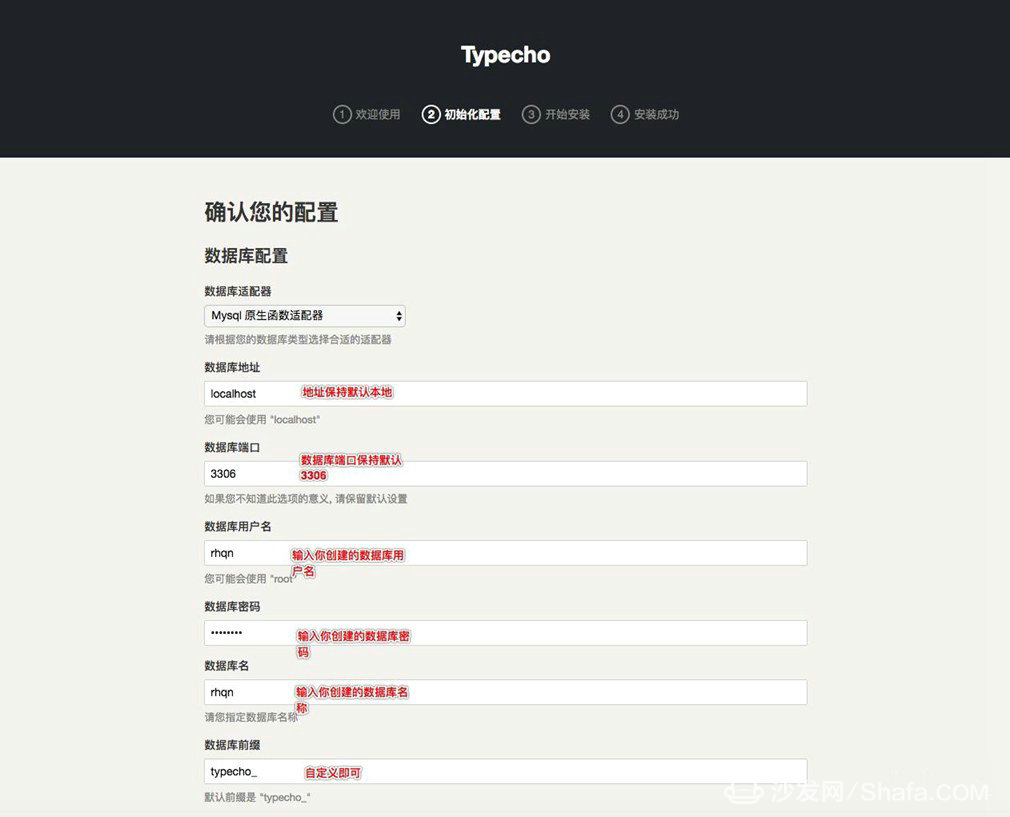
Configure database information:
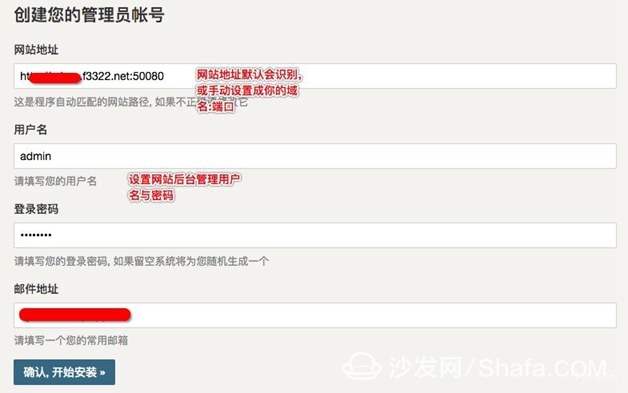
Configure webmaster information:
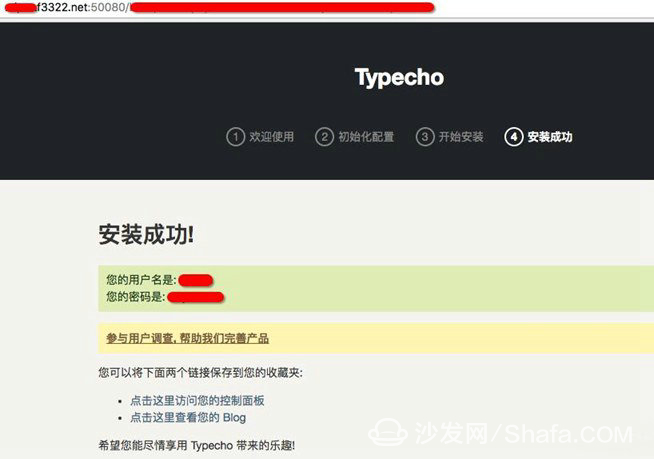
Successful installation:
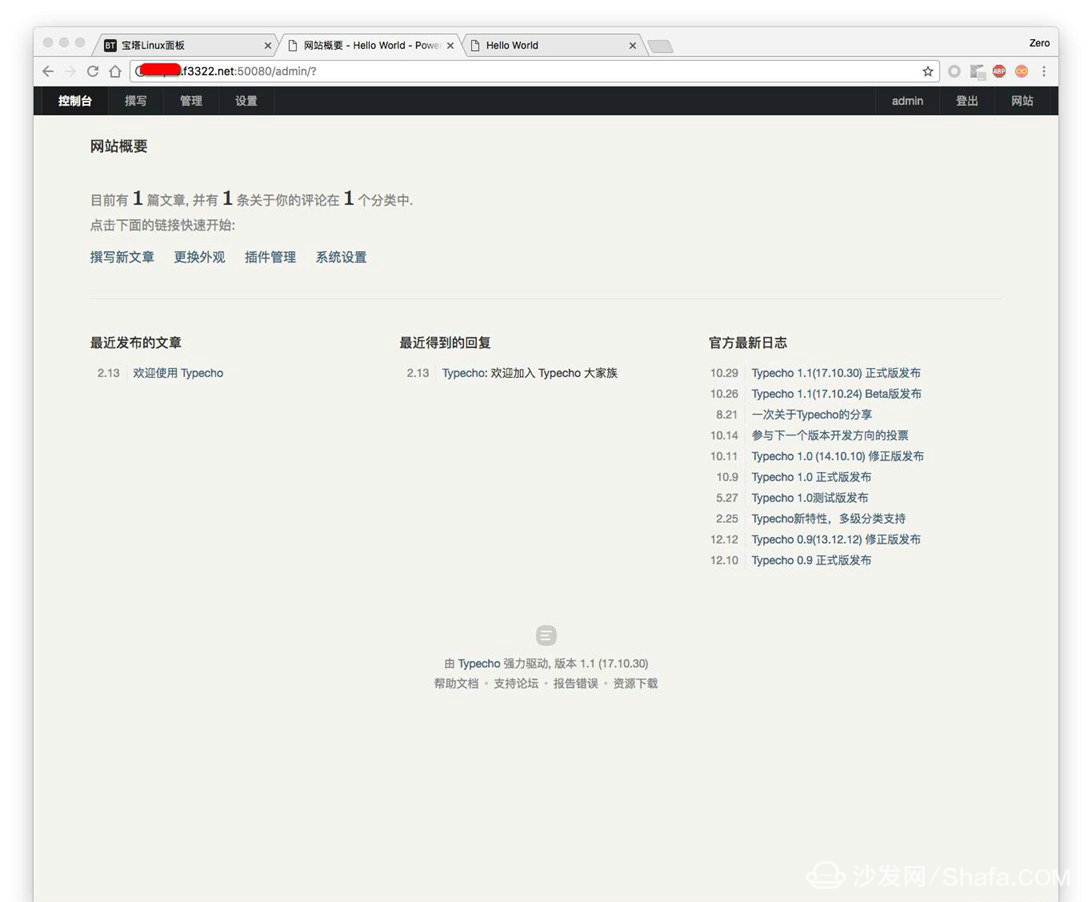
Enter the website background:
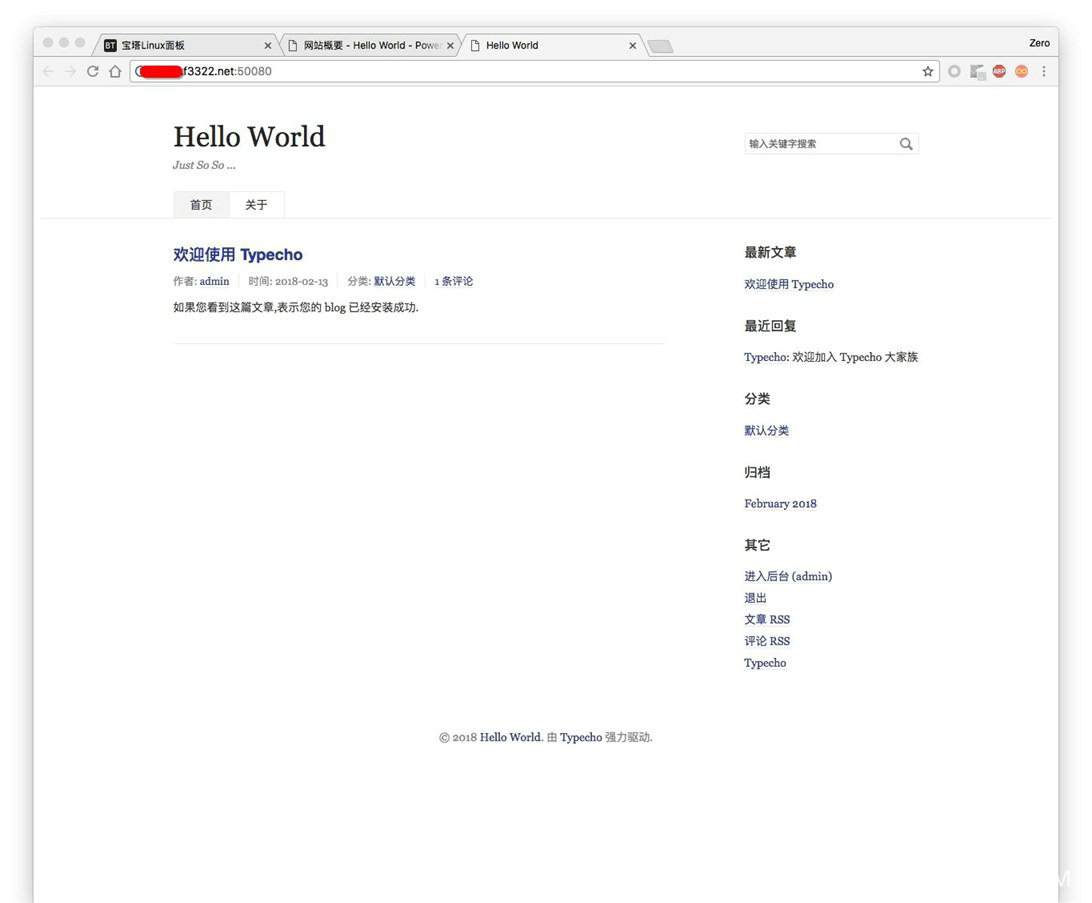
Visit website page:
You're done! Have fun and play with your own website!
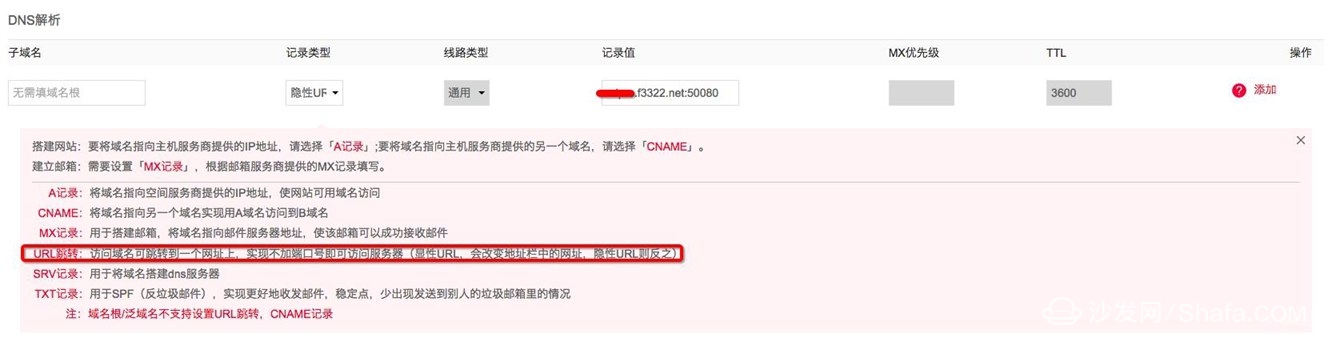
Of course, is it strange to visit the site through the domain name: port? We can solve this:
Use DNS's implicit URL feature to solve.
Of course, when your website shines, due to the limitations of millet routing performance, it is recommended to replace professional high-end routing, or to put the website on a more professional VPS server or virtual host. This article is only for technicians, website learning enthusiasts We test learning.
The 1U Brush Cable Management Panel mounts to a standard 19" rack to organize cables while keeping dust and dirt out of the rack. Constructed of high-quality steel with high-density nylon bristles, the 1U brush plate creates a clean looking point of entry and offers cable separation for simple cable organization. The brush panel also promotes proper airflow through the rack by closing off open spaces between equipment, this cable organizer comes complete with 2 sets of rack screws for easy installation.
Brush Type Cable Management,Brush Cable Management,1u brush panel,1U Cable Management
NINGBO UONICORE ELECTRONICS CO., LTD , https://www.uonicore.com